 Few things in the plant care realm for many folks can produce fear and panic quite like the subject of how to properly re-pot a beloved plant. Is it time? What should my roots look like? Am I doing this wrong? Should I even be doing this at all? I understand, especially when it comes to Phalaenopsis orchids. There are a number of things to consider when taking on this task. The very first one is: breathe (it’s okay!), then relax yourself and let’s dig a little deeper into a few things to consider before you begin trimming orchid roots.
My goal with this post is by the time you finish reading it, you will feel much more comfortable and confident that you can successfully identify good vs bad roots and safely trim them if needed.

Gathering Up The Essentials List
There are a lot of Phalaenopsis orchid lovers out there and a whole lot of experts, who truly know what they’re doing. However, as with most subjects, there will be differing opinions, ideas and tactics for going about any given task. Here, I will give you the tips and tricks that have worked for me personally.
With a collection of over 100 Phalaenopsis orchids thus far, I’ve had some opportunities to make my mistakes and learn from them 🙂 I suspect that each day will still be a learning process and I don’t know about you, but I enjoy that very much. So, if you would like to join me on this learning adventure, here’s what you’ll need to start this process:
- A pair of pruning shears, sharp scissors or sharp sterile knife
- A container of 70-100% isopropyl alcohol (I like to pour mine in a small sized travel spritzer bottle)
- A container of 3% hydrogen peroxide, also poured into a small travel sized spritzer (if available)
- Some ground cinnamon
- A pair of clean gloves (I use the medical/surgical variety, enabling me to still have my tactile abilities)
- Optional: A candle lighter with the long handle

The Most Important Step: Disinfecting Your Cutting Tool
I personally have been using the Isopropyl alcohol solution as I mentioned above, but others have been using bleach to soak in for 30 minutes as well. This is one of those areas where you are welcome to choose what works best for you & what you might have on hand already.
What I do is use the spritzer with the alcohol in it, thoroughly soaking the cutting instrument, then I either let it air dry or I use the candle lighter to burn off any excess alcohol. Do be careful if you burn it off because alcohol is highly flammable!
Keep your hand far enough away from the handle of the shears to prevent the flame from coming into contact with your skin. If you get a flame, you can blow on it to quickly put it out. Or you can go the safer route and simply let it air dry 🙂 The next step…
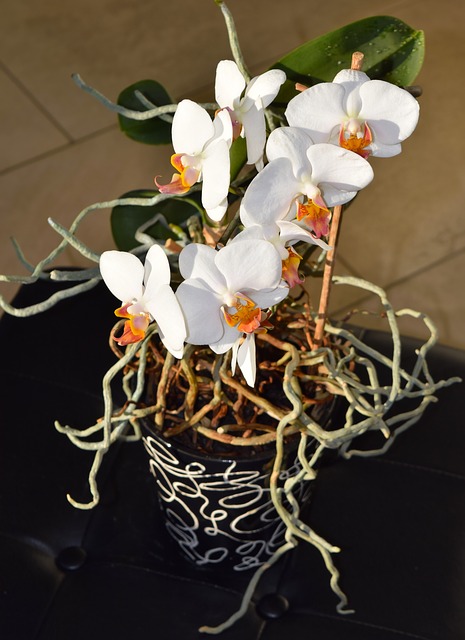
Having A Looksee At Your Orchid’s Roots 
The very first thing I recommend personally is to carefully hold your orchid in one hand and rinse the roots with lukewarm water with the other hand.
This will dislodge any old, attached media and will plump your healthy roots, enabling you to know what you’re working with. It also makes the roots much more pliable, preventing unnecessary splitting that can lead to disease.
There are a few different colors to look for in helping you to identify your orchid root’s health.
First things first, now is the time to put on that pair of gloves I mentioned earlier before you handle your orchid to prevent the spread of all the funky stuff 🙂
Here is a breakdown of those colors:
Green & plump: These are healthy orchid roots that have recently received water. They are not in need or trimming or water. Thumbs up – you’ve done well!
Silver or grey: Your orchid roots are okay but could use a drink of water.
Brown: These are the roots to focus on eliminating. Brown can mean several things but it does mean dead or almost dead. Some dead roots are normal upon inspection. Some experts say that as much as 1/3 of your Phalaenopsis roots may be brown and still be within normal range of what you should find. If the majority of your roots are brown, this is a classic sign of over-watering which has caused root rot. Brown tips on otherwise green and plump roots is a sign that the roots are starting to form some rot due to a watering issue most likely. Phalaenopsis Orchids cannot be stagnant in water. They must drain completely in order to be healthy.
The most effective way I have found of watering an orchid is simply dousing the potting media from the top with lukewarm water, thoroughly soaking it and letting it drain all the way out, even tilting the pot gently to ensure no excess water is left behind. If you are using the correct type of orchid pot, such as the ones that can be found here at my shop, water will not pool and cause the roots to rot.
Yellow: The question is often asked – are yellow roots a sign that my orchid is dying or sick? The short answer is no. This one catches many by surprise, including myself at one time. I always assumed that a yellow orchid root was one that was in the process of becoming brown and therefore was unhealthy. However, it turns out that is a myth. Yellow orchid roots are ones that have not been exposed to sunlight and therefore have not gone through the photosynthesis process to turn them green. If the root is yellow but otherwise plump, they are healthy and you should not cut them off.
White and crispy: If when you touch the roots, they are dry, flat and crispy feeling, these are definitely dead, dried up and long gone. They are roots that have not received water in quite awhile and will never again be able to absorb water or nutrients in any form. These are roots you can remove safely.
Here is a video demonstration that you might find helpful for this process:

Safe Orchid Roots Trimming
Now that you can identify the health of your orchid roots by their colors, you can now take your sterilized cutting tool and begin the trimming process.
If you have wet your orchid’s roots and caused them to be pliable, you should be able to gently maneuver the mass of roots to untangle any, very gently, that are wanting to cross into others. If you find that a gentle tug isn’t dislodging the root, that’s OK, leave that one alone unless it is dead and in need of being removed. If it is indeed dead and the root it’s tangled with is dead as well, go ahead and use your tool to cut those away.
If only a portion of the root is dead, make your cut right in the area where there is still live, green tissue. (We will cover the cut in cinnamon later as described below) If the entire root is dead, go ahead and cut pretty much flush with the base (where it began).
Keep in mind that any cut we make leaves an open wound which makes the orchid more susceptible to disease, so we try to cut away as little as possible, while still getting rid of the roots that threaten the health of our orchid later on down the line.
Very carefully inspect your root mass. Take your time, don’t rush this. If you accidentally cut off one of the healthy root strings, yes, it’s upsetting but don’t panic, your orchid should be okay. You can breathe again and move on. 😉 Just relax, have a close inspection of the colors and plumpness which will determine whether it is a viable root still. If there’s any major doubt, I’d go ahead and leave it be at this time.
Why Cinnamon and Peroxide?
I’m glad you asked! Cinnamon is a trick that not everyone knows about when it comes to orchid care but it’s a powerful one! Cinnamon is a proven all-natural fungicide, pesticide and insecticide! Anywhere that you have made a cut to an orchid, I recommend sprinkling some powdered ground cinnamon on it.
Creating a bit of moisture on the area that you have cut (especially if you have just cut off a flowering stem), and then covering it with this cinnamon will prevent the wound from being so open and susceptible to fungus and disease.
Peroxide? For orchids? How do I use that? Everyone’s method on this is different. However, crown rot in orchids has been proven to be reversed by spraying in the crown regularly with hydrogen peroxide for 7-10 days.
It’s not only effective for crown rot but I have found it to also be effective on my orchid root system when there are some spots of potential fungus or bacteria growing. Thoroughly spraying the roots will discourage the growth of pathogens that make your beloved orchid sick.
If there is any active rot happening, you will notice that the peroxide is bubbling and doing its job. Make sure the peroxide is not too weak and expired.
My routine is typically to spray the roots with peroxide first and then hold the roots (still bare) down in the new pot that will be this orchid’s home. While holding it there, I sprinkle ground cinnamon all over the root system just to add a little extra protection.
There has been science to also prove that sprinkling cinnamon on the potting media deters spiders and other creepy crawlers from invading your orchid’s house.
Time For Your Orchid’s New Home… 
After sprinkling with the cinnamon, while still holding the orchid bare root in the pot, I go ahead and add my potting media at this point to carefully secure the orchid in its pot.
The orchid should not wobble but it should also not be overly packed in, either. Gently tapping the side of your pot while securing your plant in the other hand allows the orchid bark to get in between the little crevices of the roots without causing damage.
Keep tapping until you are feeling more stability for your orchid. Try and keep the orchid centered in the pot (or close to it) as much as possible. Sometimes they will shift a little bit, but that’s OK.
They do need plenty of room to spread their roots (while still being snug), receive air flow and light transmission. If you are interested in my favorite potting media for orchids, you can find that in my shop here. It’s the best stuff I’ve found yet, by far!
I Can Do This, Can’t I?
Yes, you can do this. Here’s the reality… if you have more than one orchid, you will get better with this over time. It’s just a fact. Practice makes perfect, right? If you still feel completely paralyzed at the thought of trimming away roots on your orchid, I recommend checking to see if you have any American Orchid Society meetings in your local area. They would be glad to help you become more comfortable with this whole process.
Just remember, Phalaenopsis orchids are fairly hardy. They can rebound from a whole lot of mistakes. Though I don’t recommend pushing your luck on a lot of it, it’s not as scary as it all may seem either.
Orchids add luxury to your life like nothing else can. They are my absolute favorite plant of all time. The more you learn about them, the more you fall in love and get bitten by “the orchid bug.” It is my hope that I have helped you understand a bit about taking care of your orchid’s roots today. Any questions you have, please, feel free to comment in the box below and I’ll be more than happy to answer any questions I can. Have a blessed day! Let me know if this has helped you at all. Thank you for coming!
Excellent article! I have had orchids and could have used this information. Now my son is raising orchids, so I will turn him on to your site. I agree, they are beautiful plants. You are fortunate to have so many of them! I guess you had no choice but to learn how to take care of them, right? I am curious — will you just be covering orchids, or will you discuss other plants as well at a later date?
Hi Fran,
Wonderful to hear from you! Your comments have touched my heart. I’m very grateful for your words and support!
Haha, you are correct about having to learn how to properly care for this very unique and special plant. It was a bit of a learning process and as always, that process will forever continue. When we stop learning is when we fail, don’t you think?
To answer your great question, (thank you for asking it), I plan to cover as many indoor potted plants as possible. My guess is that Phalaenopsis orchids will take the lead as to how many articles are created topic wise, but you never know about that sort of creative flow. As of now, I added 2 or 3 posts about other plants and enjoyed writing a few facts about those too.
Your son is raising orchids? How wonderful! I sincerely believe that plants teach us so much about life – they cause us to be more empathetic and compassionate, simply making us better human beings. Wouldn’t you agree?
I would love to hear more from you and I hope that I can create articles that are informative and fun to read for you and your son 🙂 I hope you have a beautiful & blessed day! Thank you once again for coming here and taking your time to start a conversation.
Your article is really nice…
I live in Thailand and orchids are all over the place!
I have often thought of buying some for my wife, as she loves them, but I thought they were too delicate to look after.
Your post inspired me….
Especially today as it is an anniversary for us, so it could be the best day to surprise her. And of course give her the link to your site for tips on what to do.
Tim
Tim! Happy Anniversary!! My goodness, what a beautiful day for you indeed. I’m so happy for both you and your wife. I pray you will have many many more happy and blessed years ahead of you together.
I thank you so much for your comment. Orchids aren’t nearly as difficult as they are often made out to be. They do have very specific requirements but most people can easily learn to meet their needs. I bet your wife would be thrilled to have one of these as a gift to remember for years to come 🙂
God bless you and your wife. Thank you again for taking the time to stop by and comment. Hope you will come again.
I’ve always liked Orchids. Maybe because I spent a long time working with plants at my last job – making sure plants were watered and flowers were on display for the customers, etc. It was a great job!
Although, many times there were accidents, with the breaking of orchid pots especially, but I never really knew how to re-pot the plants the right way. That bit was never taught by my employer.
My mom buys an orchid from time-to-time, so this will be a great article for either forwarding to her or learning this stuff myself so I can help her trim the roots and re-pot the plants whenever the need arises.
Thanks for sharing a little about the cinnamon trick too because I actually never knew about this trick for helping with the care of orchids. We learn something new every day, don’t we?
From a beginner standpoint, would you say it’s best to start out with taking care of a smallish orchid for good practice before “branching out”? Pun intended lol.
Thanks, Neil
Hi Neil, thank you kindly for stopping by PottedOpulence and taking the time to write back!
I love your backstory. It may not be for everyone, but more often than not, once you work with plants and understand them, you can’t help but love them and find them therapeutic, you know? Your job definitely sounded like a great job. I’d take that over the majority of the nightmare jobs I’ve survived 🙂
Repotting an orchid, thankfully, doesn’t typically need to be done except when the orchid is showing signs of outgrowing where its at. Sometimes that is 1 year, possibly even 2 years. Even then, it’s good to evaluate whether the potting media has broken down so much that it is no longer supporting the orchid with proper health and support or if the roots are simply just too crowded and in need of branching out, as you eluded to, hah!
You are absolutely right about learning something new every day. I love that, don’t you? And to answer your question, as a beginner with orchids, I would focus more on “is this a healthy orchid?” vs the actual size of the plant. The worst part is, especially when buying from a store, orchids are typically in the wrong type of soil and in pots that have no drainage – both of which will kill an orchid quickly. All stores want to do is market them to you and get them sold, not so much concerned with what happens once you get it home.
That unfortunately makes people believe they are no good with orchids and should never buy them again. When in reality, all you need to do is get it home, let it go through its flowering process (waiting until the blooms fall off) and then going through the repotting process, making sure you have the correct orchid bark mix and the correct orchid pots. There are specific pots and potting media they require. Regular plant pots and soil will not work. Orchids will die.
Hopefully I have answered your question. Thank you again for coming by! Have a blessed day.
Great article! My mom has a lovely orchid in need of some help, so I was taking notes on how to spruce the plant up for her…if she asks me too lol.
Question: Is it okay to use regular 3% peroxide or would there be any benefit to using the food grade (35%)? I have both available.
Hi Irma,
Thank you for stopping by PottedOpulence! I am glad you enjoyed the article. Do you know what kind of orchid she has? Is it a Phalaenopsis orchid, or another variety? Each one definitely has unique requirements. You can tell a lot about the health of an orchid by its leaves as well. Typically, it’s one of the first ways to diagnose a watering issue.
To answer your question, you definitely would not want to use any greater strength than 3%. You can use 5% but it would need to be diluted with water. I find that 3% is safe to be sprayed directly without dilution. 35% food grade peroxide is extremely powerful. I would leave the use of that for other purposes. 🙂
Thank you so much for your question. Come back any time. I hope that I’ve been of help to you.
Wow, I’ve not really come across a resource as this in the past. For someone looking to enter this niche, what do you think are the best resources to learn the basics? As in, basic guides for beginner gardeners.
Hi Charlice! I hope you are well today. Thank you for taking your time to stop by and share your thoughts! 🙂
The basics for orchid growing are more simple than one might think. I’ve written an article about the fundamental needs of Phalaenopsis orchids found here in case you might be interested in that.
MissOrchidGirl on YouTube also has some fantastic resources for those looking to grow these beauties in their home.
Basic guides for beginning gardeners could be a little tricky as there are so many and they will depend on what kind of gardening you enjoy the most. Mother Earth News however has some very helpful information for those looking to get in to gardening and the best ways to start so anyone can understand and enjoy.
I hope you find these articles interesting! Have a wonderful day! ♥
Hi! Thanks for your artical!! I was looking for one specific question – where to cut a rotten roots. I cut them above the rotten part and covered them with cinnamon, but I wasn’t sure if it was the right way to do it. I saw many videos where they were cutting the roots below the healthy part leaving a piece of rotten root. So thank you very much for your info. I was really scared that I killed my orchid. How I’m keeping my fingers crossed hoping that my orchid will make it. Thanks again and have a wonderful day!
Hi Zaneta! It’s wonderful to hear from you! May I ask, how is your orchid doing now? Many orchids are typically very forgiving plants, thankfully! Since their care is so different from most houseplants, it can be a learning process. I’m betting that where you cut your orchid’s roots will be just fine.
Phalaenopsis orchids, in particular, can grow “healthy root offshoots” – even from roots that are otherwise dead and rotten. That’s why sometimes when you go to repot an orchid – you may see a long root that has a top half of dead root with healthy root past that point. The new, healthy root may even be growing sideways from the dead root. All of this is perfectly normal. Unless the top half of the root is particularly rotten and unhealthy, I’ll often leave those intact.
I have found cinnamon to be a major help in reducing fungal issues and also other pest infestations. I’m glad you decided to sprinkle a bit on those roots.
I’d love to hear back from you and find out how your beloved orchids are doing now? Take care & thank you for your comment!